Do you know how to setup a Boot to VHD Image?
Updated by Brady Stroud [SSW] 1 year ago. See history
Using Boot to VHD is very similar to dual-booting your machine, except that you do not have to partition your hard drive. It also has performance benefits over using a Hyper-V server for presentations. Pre-Requisites
- The presentation computer running Windows
- A SysPreped VHD image to be deployed onto the presentation computer
- Copy a SysPreped VHD image to the laptop to be used for the presentation.
- Open an Administrative command prompt.
- Type:
bcdedit /copy {default} /d “Demo-NameOfDemo”
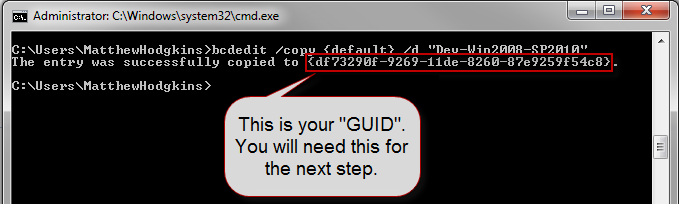 Figure - Creating the entry using BCDEdit shows your GUID 4. Type:
bcdedit /set <GUID> device vhd=[D:]\VM-DEV-SharePoint_2010_Public_Beta.vhd
**D:** is the drive the VHD is located and VM-DEV-SharePoint_2010_Public_Beta.vhd is the location of your VHD file. Make sure you replace **<GUID>** with the GUID you got in the previous step. 5. Type:
bcdedit /set <GUID> osdevice vhd=[D:]\VM-DEV-SharePoint_2010_Public_Beta.vhd
**D:** is the drive the VHD is located and VM-DEV-SharePoint_2010_Public_Beta.vhd is the location of your VHD file. Make sure you replace **<GUID>** with the GUID you got in the previous step. 6. Type:
bcdedit /set <GUID> detecthal on
 Figure - Each time you run a BCDEdit command it should return "The operation completed successfully" 7. Reboot the computer and now you will have the option to choose between Windows 7 and the new Boot to VHD image.